How to take a picture on a mac? Can I capture pictures with my Mac in the same way as I would a camera? You can take as few as one self-portrait on your Mac or as many as you want. Mac users can make the built-in camera their default photo-taking tool. Lucidcam will discuss how to use a camera on a Mac.
Table of Contents
- 1 Can I Take Photos With my MacBook?
- 2 How To Take A Picture On A Mac With Camera
- 3 How Do I Take Videos With My Webcam On Mac?
- 4 How to Save & Share Selfies Taken on the Mac?
- 5 FAQs
- 5.1 How can I create more effects for Photo Booth on Mac?
- 5.2 How can I take pictures on my laptop?
- 5.3 Is there a snipping tool for my Mac?
- 5.4 Why is my Mac Camera on when I need it?
- 5.5 How do I take a picture with my Macbook 2023?
- 5.6 How do I take a picture with my Macbook front camera?
- 5.7 How do I test my Mac camera?
- 6 Conclusion
Can I Take Photos With my MacBook?
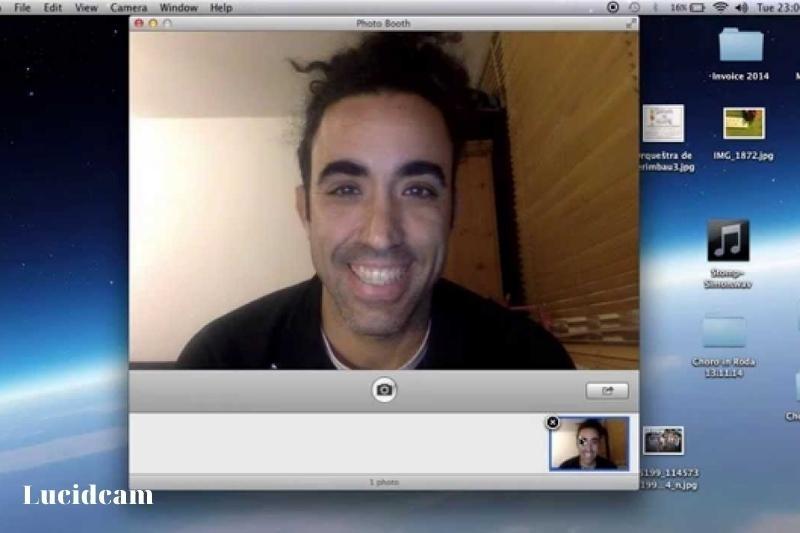
A FaceTime camera is included in both the MacBook Air and MacBook Pro. The iSight camera now goes by this moniker. The built-in Photo Booth app for MacBooks lets you take pictures and record videos using the FaceTime camera.
How To Take A Picture On A Mac With Camera
Part 1. Default Way to Take Photo with Webcam
An integrated iSight, FaceTime, or FaceTime HD camera is often seen at the top of Mac screen and laptops. If you want to capture pictures or make films with a FaceTime camera, you can do it by using the usual Photo Booth tool.
- Step 1: Get Finder running on your Mac. Dispatch the Applications folder. then start the Photo Booth program. Your Mac camera’s green light turns on, indicating that it is ready.
- Step 2: Click the View Photo Preview option in the Photo Booth software on your Mac. You will see the Take Photo button here (red cam). To see a video preview, click the View Video Preview button and then press the Record Video button.
- Step 3: You can select whether you want to take one photo or a set of four photos by clicking on the buttons in the bottom left corner. Click the red camera button to start taking pictures with your webcam.
* PhotoBooth is an official app to take pictures on Mac using Webcam or the iSight camera. You can easily capture live photos and videos on Mac OS X without the need for any third-party apps.
You can use this application to add 36 amusing effects to your images before you take them.
Part 2. Professional Way to Take a Webcam Photo
This section will show you how to take webcam pictures easily and professionally. You can record webcam video and take crisp pictures with the finest webcam recorder for Windows and Mac users, Aiseesoft Screen Recorder.
If your webcam is enabled, you can record anything on your Mac’s screen. Additionally, you may change the size of the image and add labels in the form of text, rectangles, lines, or arrows. You can modify the result image by adding your own labels.
- Step 1: Click on the Download button to install and launch this webcam recorder software for Mac. Select Webcam Recorder from the main interface.
- Step 2: The webcam screen will appear on your Mac. You can click the Screenshot icon (Camera), to take a still image with the webcam.reen will appear on your Mac. You can click the Screenshot icon (Camera), to take a still image with the webcam.
How Do I Take Videos With My Webcam On Mac?
In addition to taking pictures, the Photo Booth software can record videos and add special effects.
- Select Applications from the Go menu in Finder by clicking on it. To start the program, double-click Photo Booth in the newly opened folder.
- The image from the webcam appears right away. You can make this window full-screen by simultaneously pressing the Cmd + Ctrl and F keys.
- In the lower-left corner of the screen, click the Filmstrip symbol.
- By default, the computer’s microphone will be used to record audio. If you have a wireless headset with a microphone and want to utilize it, you can let macOS know. To enter System Preferences from the Apple menu, click Sound.
- Select the Input tab in the newly opened window, then click the name of your headset. To return to the Photo Booth program, close the System Preferences pane.
- The red button in the middle started to resemble a camera. Click on a clip to begin recording it, or press Cmd + Enter. A three-second countdown starts so you have time to alter the frame. The capturing starts. Click the red button once more to end the recording.
Your video is shown at the bottom of the window.
You can create more entertaining videos:
- In the lower right corner of the screen, click the Effects button. The first eight video effects—each with a live-action, animated thumbnail—are shown. These effects are the same as those used in photographs.
- Click the right arrow to view more effects. Select the one that grabs your attention. Use the Esc key to choose another image if the one that is displayed is too small for you. A slider can be used to change the strength of some effects.
- Simply start recording by clicking the red button at the bottom of the screen to achieve the desired effect. Moving outside of the frame could cause the effect to be lost.
- Click the red button once more to halt the video. Your video is shown at the bottom of the window. To view the complete result, click on it.
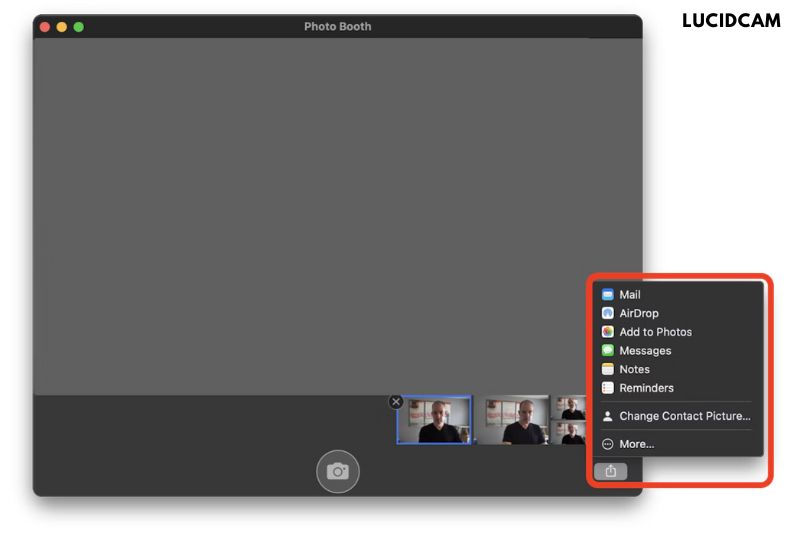
Your Photo Booth app will locally save webcam images within the Photo Booth app itself. At the bottom of the app, the window will be a list of all your photos. You may relocate those images to the Photos app if you’d like.
Simply choose the photo you wish to share and click the share icon on the bottom right of the app window to share Photo Booth images. You may choose how to share your picture with others from a menu that will appear!
Related information:
- How To Open Camera On Mac 2023: Top Full Guide
- How To Image Search On Iphone From Camera Roll 2023: Top Full Guide
- How To Get Grid On iPhone Camera 2023: Top Full Guide
FAQs

How can I create more effects for Photo Booth on Mac?
Select the Effects button in the Mac version of the Photo Booth program. Click the browse buttons at the bottom of your window to view effect previews. Click on an effect to choose it.
How can I take pictures on my laptop?
- Click the Camera app icon on the Start screen.
- To continue, select Yes.
- Taking pictures by smiling and clicking or tapping the Camera button.
- You can choose to change the camera if you see it.
Is there a snipping tool for my Mac?
By pressing Shift and Command 5, you can open the Mac snipping tool’s primary control panel. Alternatively, you can rapidly screenshot on your mac screen by pressing Shift and Command.
Why is my Mac Camera on when I need it?
When you use your iMac, the green indicator light can be on. Even if there are no open applications, this is the case. Your iSight camera has activated if the green light is there. Also required is the installation of Photo Booth, iMovie, or that.5. Can I adjust the Camera in my Mac?
Apple’s refusal to give customers quality control is just as annoying as the hardware. On Macs, the FaceTime camera is not accessible through System Preferences.
How do I take a picture with my Macbook 2023?
- Photo booth, please.
- Click Effects and select the desired effect if you want to add a unique touch to your shot.
- You have the option of taking one snapshot or four quick shots.
- Click the camera button when you’re prepared.
- Three seconds later, a picture will be taken.
How do I take a picture with my Macbook front camera?
If you see the View Photo or View Video buttons on your Mac in the Photo Booth app, click them to reveal the Take Photo or Record Video buttons. Click the “Record a movie clip” button in the bottom left if the Record Video button isn’t visible.
How do I test my Mac camera?
- Click the Finder icon in the Dock bar.
- In the Finder, choose Applications from the menu bar.
- Then click twice on the Photo Booth application. You will see the webcam feed, and the Webcam should turn on immediately.
Conclusion
In conclusion, it’s really easy to take a picture using the camera that’s already built into your Mac computer. You can do it in just a few steps by using an app like Photo Booth or the camera feature in other apps.
You can also make your photos look different by using effects or filters that are built into the camera. This provides users with a range of options for their images
